Monday, November 4, 2013

More Than Just a Wax Melt Mold

We recently brought in two sizes of Wax Melt Clam Shell Molds that are designed for making squares of scented wax that burn in a candle diffuser.  A huge selling point for these little containers is the fact that they not only act as a mold for the product that goes into them, they are also the packaging that you can sell your products in!  They have a hole punched out at the top so they work perfectly with peg hangers.  We wanted to show all our lovely customers that they are not just good for wax tarts, but for massage melts, bath bombs, melt and pour soap, bath candies, and more!  


Firstly we wanted to test them out to see just how they function for their main use as a wax melt mold.  We melted about 120-130 grams of EcoSoya Pillar Blend Wax in a double boiler to about 150 degrees. 


Remove from heat and colour.  We used our Seafoam Green vegetable-based candle dye pad, shaving in a small amount at a time.  The darker you want the colour to be, the more you add but keep in mind that melted wax always looks darker than solid wax.  Try dipping the back of a spoon into the wax and rapid cooling it in the freezer to see the true colour.  Once the candle dye is all melted and combined, add your fragrance.  We used two teaspoons of our crisp and fresh Sea Breeze scent, which is the equivalent to about a 10% scent load (the EcoSoya waxes are designed to hold up to 12% fragrance).  


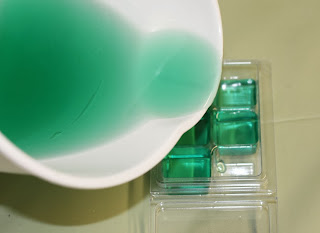
Pour the wax into a Small Wax Melt Mold at a temperature of around 130 degrees.  Let the mold sit for a few hours in order for it to harden completely.  To use, just pop the bar out of the mold and break one square off, then toss into your favourite diffuser.  Just like that you have a safe and eco-friendly way of smelling delicious scents all around the home!

Next we made Massage Melts. This is a super convenient way of making these little skin treats!  There's no mess and the molds are very inexpensive.  Try the recipe for massage melts here or feel free to use our Massage Bar Base!  Massage Melts are not just a trendy way of massaging, they provide some exceptional skin care properties.  Super high in cocoa butter, they are a wonderful way of delivering moisture to dry areas.  Simply melt all the ingredients in a double boiler or microwave until no solids remain.


Add your essential or fragrance oil and stir well.  Here we added White Grapefruit and Bergamot for an energizing experience!  Make sure that the massage melt base is not higher than about 130-140 degrees, then pour into the Small Wax Melt Molds.  Let harden for a couple hours before use.  To use: simply break the squares inside the mold and use one at a time for a sensual massage experience!  These squares are absolutely perfect for using around dry elbows, knees, and feet, especially at this time of year when it starts getting chillier! 
 
Our following project was to try using Melt and Pour Soap in the wax tart molds.  They turned out fabulous and would be perfect for guest bathrooms!  


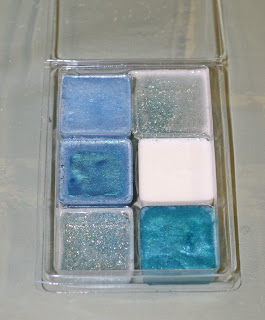
Step 1: Melt your melt and pour.  We varied the pigments used and made almost every square a different colour; because this mold has separate chambers for each square of soap it gives you more time to do each colour.  Melt a small amount of the base at a time and make sure you don't overheat it.  Add the mica of your choice.  In this snowflake-themed soap we used Blue Pearl Mica, Peacock Blue Mica, Sky Blue and Silver Glitter, and White Mica.  With each little batch that you do add a few drops of fragrance.  We used our crisp and warm Sleigh Ride.  Pour one by one into the Large Wax Melt Molds, ensuring your temperature is no higher than about 130 degrees.  


Once the soap has thickened to the point that it has a defined skin on the top, but not rock hard, pour a thin layer of clear melt and pour over the entire mold to seal all the colours together. 


Wait 12 hours, unmold, and cut into the individual squares using a Stainless Steel Cutting Blade.


Cute!  Our next thought was to see if bath bombs would work in the Large Wax Tart Molds and they certainly do!  For a recipe on how to make bath bombs click here.  Mix all the dry ingredients together in a bowl.  

Add colour and fragrance to the desired levels.  We used our Canary LabColor and Pumpkin Pie fragrance oil.  

Moisten the dry ingredients with Witch Hazel and mix with your hands at the same time.  Your mixture is ready when it holds its shape in your hand after you make a fist with it like this:


Be careful not to over moisten!  If you add too much witch hazel the baking soda will react and cause the mixture to grow in volume, not what you want in this situation!  Pack the mixture into the Large Wax Melt Molds.  


We used a little too much Witch Hazel, can you see how it's foaming around my fingers?  That's not exactly ideal, if there's too much moisture it will be crumbly when you try to take it out of the mold and you'll need to keep it in there for longer.  We kept the bath bomb mix in the mold overnight and cut it in the morning with the Stainless Steel Cutter, and the result was actually pretty awesome!  These personal-sized bath bombs work great and release the soothing scent of pumpkin pie while they bubble.  

  
As the holiday season fast approaches we urge our customers to think outside the box and try something new!  You could even make a whole line of products in the wax melt molds and package them in our selection of Gift Baskets!

Monday, October 7, 2013

Spotlight on Pumpkin Seed Oil

With fall now in full swing it seems that everybody is going nuts over pumpkin!  Lattes, scones, pies; pumpkin is everywhere so we decided to feature our wonderful Pumpkin Seed Oil in a product spotlight this week.


What is pumpkin seed oil?  
  • Pumpkin seed oil is cold pressed from the meat of pumpkin seeds.  Our pumpkin seed oil has been refined and has a slightly nutty scent.  It is golden in colour and penetrates the skin at a moderate speed.  It leaves the skin feeling silky smooth and can be used in hair care, lip balms, serums, salves, even soap!


What is the benefit of using pumpkin seed oil?
  • It has a high content of unsaturated fatty acids.  This can help to ease inflammation and soothe irritated skin.  It also is very high in linoleic acid which encourages the repair of broken skin and reduces transepidermal water loss. 
  • It boosts lipid production. When the lipid layer is stripped skin is more susceptible to moisture loss and damage.  With a healthy lipid layer comes stronger barrier function, more moisture retention, and softer, more supple skin.
  • It can contain a high percentage of tocopherols, which lends anti-oxidant and skin softening properties.
  • It is naturally high in Vitamin A which helps to eliminate free radicals, perfect for facial care products.
This medium-textured oil is similar in feel to rice bran or sesame oil, try substituting pumpkin oil in your next recipe!

Pumpkin Cold Process Soap Formula:

In the past we've done a delicious pumpkin spice soap for fall, now is your chance to make your own!  Here is the formula for a 4 lb batch:

Vegetable Canola Shortening           540 grams

Coconut Oil 76                               540 grams

Pumpkin Seed Oil                           240 grams

Almond Oil Sweet                            44 grams

Water                                              500 grams

Sodium Hydroxide                           200 grams

Follow the basic soap making instruction on our website here with a soapmaking temperature of 120°.

You know what would be the perfect scent for this soap?  Something sassy with a velvety base of pumpkin and notes of cinnamon and cardamom.  Keep your eye out for the launch of our Pumpkin Spice fragrance later this week!

We would like all our customers to be able to try Pumpkin Seed oil in one of their formulas, so for the month of October we are offering a special free giveaway when you mention Pumpkin Seed oil in the comments section of your order.  It can be for pickup or for shipping, just be sure to say "pumpkin seed giveaway" in the comments and we'll include a free 30 ml bottle at no charge!

Tuesday, October 1, 2013

Spiced Stout Cold Process Beer Soap

Happy October first, everyone!  To many October means Oktoberfest, a huge celebration originating in Germany in the 1800's traditionally brimming with food, German folk songs, lederhosen, and of course, beer! There are several huge Oktoberfest celebrations around Canada and a few in the lower mainland of BC. This delectable combination of Belgian beer and family fun inspired us to make this tutorial for a Spiced Stout Soap.  This beautiful, high-lathering bar is softly fragranced with rich notes of caramel and subtle spice.


Working with beer in cold process soap is NOT for a beginner.  It is quite an advanced process that requires good comprehension of soaping techniques.  If you haven't tried making cold process soap before we recommend getting a few successful batches under your belt before trying this soap.  One difficulty of making with beer soap is that it starts saponifying extremely quickly, so there's not much working time.  We recommend dropping the soaping temperature to 90° to delay saponification as much as possible.  

Step 1: Pick your beer!  We chose a dark, rich stout from our local Dead Frog Brewery in Aldergrove, just 20 minutes away from us!  When choosing the beer you want to use keep in mind that the darker in colour the beer is, the darker it will discolour the soap.  We didn't use any colourant to get that fantastic chocolaty brown base colour.  If you want to colour the soap with mica or LabColors try using a lighter beer, such as a pilsner or lager.  We boil the beer which causes it to decrease in volume, so you will need more than 500 ml of liquid that the formula calls for.  This 650 ml bottle boiled down to about 480 ml but don't worry if you don't have enough, you can easily top it off with water until you reach 500 ml.


Step 2: Boil the beer.  In CP soap making you cannot use beer right out of the bottle, the carbonation will cause dangerous lye bubbles.  To get rid of the carbonation we boiled the beer for about 10 minutes while whisking.  Be very cautious when doing this; the beer will increase in volume as it gets hotter and there is very good potential for it to boil over, so use a much larger pot than necessary.  As an alternative you can also open the beer up and leave it uncovered for 24 hours until it's completely flat.  If you boiled the beer let it come down to room temperature before proceeding.  

Step 3: Set up your station.  Make sure to have all the necessary safety tools: goggles, gloves, long sleeves, and lots of paper towels.  It is always a good idea to keep vinegar around when soaping as it will neutralize lye water if it gets spilled on the skin.  You will need a couple large vessels to mix the soap in (large pyrex measuring cups work great, or these plastic bowls with handles that we scored at a dollar store), a few measuring cups, two whisks, a pre-lined mold, a thermometer, and your instructions. For this recipe we used our amazing Cocoa Butter Soap Kit, measuring out your oils is one less thing you have to worry about when making beer soap!  This kit is one of our best sellers and makes a super hard, moisturizing bar.


Step 4: Start mixing your lye/beer solution.  ALWAYS add lye to water (or in this case beer), never, ever the opposite as it could cause a horrible reaction that could seriously injure someone.  Keep in mind the lye beer will heat up to over 200 degrees, so be sure to use a heat resistant container! When using beer in place of water you can NOT just dump the lye in, this will cause a volcano of caustic lye beer (trust us, this almost happened!).  Sprinkle the lye in very slowly, less than a teaspoon at a time, being very patient.  Whisk in between pours.  Try not to breathe in the fumes and make sure your face is away from the lye solution while whisking, and continue to do this until no more lye remains.  A small word of caution: there is a strange smell that occurs when the beer interacts with the lye, it can be quite pungent so make sure you are working in a well-ventilated area.  We popped the lye beer straight into an ice water bath to cool it down faster, otherwise we could have been waiting around for quite some time!


Step 5: Heat your oils.  For this technique we dropped the soap temp to 90° so your oils don't have to be heated much.  Just make sure they're all liquid and basically at room temp.  When your lye beer and oils are right around 90° you're ready to go!  


Step 6: Mix your oils and lye beer together.  A stick blender is not required as this soap will thicken up real quick with a good old whisk.  We had one on hand just in case but never ended up using it.  Whisk the mixture until it comes to a very light trace, which will only take a couple minutes.


Step 7: Separate your batch.  Pour about 2 cups of the soap mixture into another container, which will be used as the lighter swirl.  We pre-mixed about 1.5 tablespoons of oil soluble Titanium Dioxide with two tablespoons of Argan oil as a little bonus superfat, now add this to the smaller portion of soap whisking very gentle until it's all combined.


Step 8: Add wheat germ and fragrance to the larger, darker portion.  We thought this rustic spiced soap deserved a little exfoliating action so we tossed in a tablespoon of wheat germ.  If you don't have wheat germ readily available you could use ground oats, ground barley, coffee grounds, or walnut shells as a few examples.  


Whisk the wheat in just until it's combined, then add the fragrance.  The fragrance is an amazing, yummy blend that we created ourselves.  It is comprised of:

25 ml Brown Sugar & Fig Fragrance
13 ml Patchouli Cedarwood Natural Fragrance
7 ml Vanilla Oak Fragrance
7 ml Chocolate Fudge Fragrance

The result is a velvety smooth spicy scent that lingers.  Pour that into the soap and whisk well to ensure that it's all mixed together properly.  At this point you'll start to see the soap coming together quickly, you might be on the heavy side of a medium trace.  Time to get that baby into the mold!

Step 9: The pour.  Take the darker portion and pour about a half an inch worth into the mold.  Then rotate between the dark and the light portion, zigzagging as you go.


At the top we took a chopstick and did a little figure 8 swirl for intrigue, then we added some pizzazz with our Sparkle Gold Mica.  Shake the cap gently over the top of the soap, dusting it gently with mica, then blow softly to ensure it sticks to the soap.  


Step 10: Cover the mold with freezer paper then insulate the soap lightly.  You don't need to bundle it up too much, beer soap heats to a very high temperature during saponification.  Wait 24 hours.

Step 11: The unmolding!  Twist the wing nuts gently loose, then inverse the mold and wiggle that loaf out. What a beauty!


Step 12: Cutting.  Grab your stainless steel cutting blade and start chopping!  How many bars you get out of the loaf depends on how thick or thin you cut the bars.  Use our Cutting Box to get an accurate 4 or 5 oz bar.  The soap will still smell like the lye beer for a little bit, we found it went away in a couple days and all we were left with was the rich scent of the fragrance.  The colour will continue to darken over time as well.


 Step 13: Cure.  We recommend curing your soaps for a minimum of 4 weeks.  This creates a harder, longer-lasting bar.  


Step 14: Sud up!  Go hop in the shower and enjoy your magnificent Spiced Stout Soap!  

Wednesday, September 18, 2013

Fall Pinterest-Inspired Crafting

Here at Voyageur most of us are obsessed about autumn. The way the leaves turn orange and fall with the swirling wind, cozy sweaters and boots, and warm fall decor that makes you feel more at home than ever.  As active Pinners we were overwhelmed by the influx of fall themed pins over the past couple weeks (it seems like we're not the only ones obsessed with this season), and we got inspired!  This week we've taken some fantastic ideas we found on Pinterest and given them our own spin!


 First up are these amazing fall pumpkin decorations.  They are so easy to do and only cost a couple dollars each!  You can use real pumpkins for the base but we picked up a couple plastic pumpkins from the dollar store and no one could tell the difference!  We covered the pumpkins in modge podge then gently rolled them in epsom salts.  They give the pumpkin a frosted texture that looks oh-so-fancy!  We then cut out the top of the pumpkin and arranged fabric flowers in the center.  This could easily be a gorgeous centerpiece for the dining room table or a decoration for the mantle.


For the next project we chose a white pumpkin for contrast.  We applied the modge podge then sprinkled on our Ultrafine Gold Glitter and the result is stunning!  

As Halloween is right around the corner we thought we'd revisit the ultra cute Halloween soaps we did and pinned a couple years ago using our Melt and Pour soap base.
The speckled look of the tombstone was created using black iron oxide then adding oil soluble titanium dioxide, which doesn't blend in with the melt and pour soap base and settles to the bottom for a cool textured effect.  Try adding some pearly white mica into the skeleton soap for a spooky shimmer!  We used the Halloween 2 Soap Mold from Milky Way.

Our next fall Pinterest project was a yummy one. We found a recipe for pumpkin spice sandwich cookies and couldn't resist their siren call!


Calling them "cookies" is a little misleading.  These dreamy little pillows of goodness are more like moist pumpkin cakes with a fantastic cream cheese icing in the middle.  These were much enjoyed by our staff and disappeared in a flash!  Here's the recipe (taken from a cozy kitchen):

Cookies:
2 1/2 cups all-purpose flour
1 teaspoon baking powder
1 teaspoon baking soda
1/2 teaspoon ground cardamom
1 1/2 teaspoons ground cinnamon
1/4 teaspoon ground nutmeg
1/2 teaspoon salt
1 cups granulated white sugar
1/2 cup brown sugar
1/2 cup butter, softened
1 large egg
1 teaspoon vanilla extract
1 cup of pure pumpkin puree
2 tablespoons of pumpkin seeds (optional)
Cream Cheese Frosting:
1/4 cups butter, softened
4 ounces, cream cheese, softened
1 cups sifted powdered sugar
1/2 teaspoon vanilla extract
For the cookies:
Preheat oven to 350F. Line a baking sheet with parchment paper. In a medium bowl, combine the flour, baking powder, baking soda, cardamon, cinnamon, nutmeg and salt. Mix and set aside.
In another medium bowl, beat the granulated sugar, brown sugar and softened butter until combined and blended. Add the egg, vanilla extract, pumpkin and beat until smooth.
Grab a spatula or wooden spoon, and in two batches, gradually mix in flour mixture until thoroughly combined.
Drop the cookie dough onto the parchment lined baking sheet, being sure to leave room for the dough to spread. Tip: use an ice cream scoop for easy release, otherwise drop the dough using two teaspoons.
Sprinkle a few pumpkin seeds on the top of the cookies for decoration. 
Bake for 13-15 minutes, or until the edges of the cookies are lightly golden brown. They should still be soft to the touch. Carefully transfer to a rack to cool completely.
For the icing:
In a medium bowl, beat the butter and cream cheese until smooth and creamy. Add the powdered sugar and vanilla. Beat until completely smooth.
Assembly:
Flip half of the cookies upside down. Using a butter knife, dollop one teaspoon of the icing in the center of each upside down cookie. Smooth it around with your knife until the icing just reaches the edges. Top with another cookie and gently press the two cookies together.  Cookies should be stores in an airtight container and will be moist and delicious for up to 2 days.
Yields about 12 sandwich cookies.
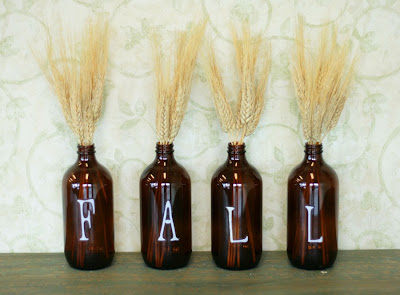
Last but not least is a gorgeous fall display that we created with our 500 ml Amber Glass Bottles.  You wouldn't necessarily think to use our bottles as home decor items at first glance, but a pin that we saw using them made us think otherwise!


This warm bottle display can be set up with only a few dollars in your pocket!  We purchased the wheat stems from our local craft store but they can be found at dollar stores as well.  The adhesive letters were purchased from a scrapbooking store.  This display would look lovely on a mantle and can be easily customized depending on the season!  

We hope we've inspired you to try your hand at crafty fall projects!

Thursday, August 22, 2013

How to Make a BB Cream From Scratch

Right now BB Creams are the hottest trend in the cosmetics industry.  It seems like every couple of weeks there's a new one on the market, from high end cosmetics companies in Europe and Asia to over-the-counter drug store brands.  Everybody has a BB Cream in their line, now you can too!


BB (Blemish Balm or Beauty Balm) Creams originated in Germany, formulated by dermatologists.  The original idea was to create a vitamin and nutrient-packed moisturizer that would also give coverage to skin imperfections.  Over the years it has gradually morphed into an all-in-one type product, taking the place of a primer, moisturizer, foundation, concealer, and loose powder thus shortening the time it takes to get ready while maximizing the performance of one product.  A BB Cream is perfect for those who have normal to dry skin and want to eliminate redness and cover blemishes while limiting the heavy feel that foundations can have on the skin.  

Our BB Cream formula is light and airy, and made of totally natural vegetable waxes and oils and pigmented with natural iron oxides. It goes on like a lotion and blends in easily while providing medium coverage. We enrich it with Honeysuckle Extract which contains Chlorogenic acid, a natural flavonoid and powerful anti-oxidant that has anti-inflammatory, anti-bacterial, and detoxifying properties, making it especially beneficial for those with acne problems. It also contains our new Ultrafine Glacial Cosmetic Marine Clay, which has incredible detoxifying and cleansing properties while absorbing into the skin and depositing phytoplankton and countless minerals (read more about our Ultrafine Clay here).  

When making a liquid foundation or BB Cream it's very challenging to match natural skin tones.  In this formula we have tested many, many pigment blends and found one to be the best for medium skin tones, which can easily be modified by adding or removing some of the components. Because not everyone has a mineral makeup scale that can easily weigh out less than one gram increments we came up with a Pigment Blend that you can tailor to your specific skin type.  You will probably have some leftovers of the Pigment Blend, try adding it to our Mineral Makeup Powder Base for a mineral loose powder foundation! Our Medium Skin Pigment Blend consists of the following:

25 grams Water Soluble Titanium Dioxide
1 gram Red Iron Oxide
4 grams Yellow Iron Oxide
2 grams Ochre Iron Oxide
20 grams Arrowroot Powder
6 grams Ultrafine Clay

Tip: For cooler, fair skin tones add a few grams more Titanium Dioxide, Arrowroot, and Ultrafine Clay. For those with naturally red complexions, add a gram or two more Ultrafine Clay and Yellow Iron Oxide. For those with darker skin, try adding a gram or two of Brown Iron Oxide. If you want a dewy glowing finish try adding Peach or White Mica to the mix!

The base for our BB Cream is a thick moisturizer that will protect and hydrate the skin. It contains Evening Primrose oil, which calms inflammation and helps combat signs of aging, Glycerin, a powerful humectant, and Vitamin E to help heal scars and minimize the look of fine lines. Here is the formula to make 600 grams:

Part A:

8%                Polawax             48 grams
4%              Stearic Acid          24 grams
4%      Evening Primrose Oil      24 grams
1.5%              Glycerin                9 grams

Part B:

73.3%             Boiling Water         440 grams
Part C:
7%                 Pigment Blend             42 grams

Part D:

0.5%      Vitamin E D-Alpha Tocopherol       3 grams
0.5%                           Panthenol                   3grams
1 %                             Optiphen                   6 grams
0.2%                   Honeysuckle Extract          1 gram

Step 1: Weigh out all the pigments into a container, then mix them together until the colour is consistent and no clumps remain.  This is quite a time consuming process, we used a paper plate and a fork which worked well, otherwise we've heard using a sheet of freezer paper and cutting up the colourants with a  popsicle stick.


Step 2: Put the pigments to the side, it's time to start making the cream!  Start by weighing out Part A into a large bowl. While you're doing this you should have the water starting to boil in the kettle.  

Step 3: When the water is just off the boil weigh out 440 grams into a measuring cup, then pour it into Part A quickly and start whisking. Continue to whisk fairly vigorously for at least 5-10 minutes to ensure all solids have melted.  This is the most crucial part of making a lotion, if it is left for longer than a minute or two it could separate!  


Step 4: Continue to whisk the cream every minute or two until it starts to thicken and cool down. Once the cream has thickened substantially (think pudding) add in the pigment blend (Part C) and whisk well until no clumps remain.  


Step 5: Take the temperature of the cream, when it is below 45° Celsius add all the components of Part D and whisk well. You can add essential or fragrance oils at this point, a few drops at a time until the desired scent level is reached (try ones like our Skin Therapy blend - perfect for the face).

Step 6: Package into tottle bottles or any plastic bottle with a treatment pump. This cream is fairly thick so we recommend spooning it into a plastic bag, snipping off the corner and piping the lotion into the bottle like icing on a cake. 


And there you have it, your own trendy BB Cream, proving you don't have to pay ridiculous prices for quality cosmetics!

Tuesday, August 13, 2013

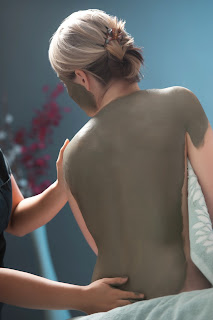
Spotlight on Ultrafine Cosmetic Glacial Clay


This week we are doing a product spotlight on a brand new ingredient, our Ultrafine Cosmetic Glacial Marine Clay

What is the difference between glacial marine clay and regular clays? 

Glacial marine clay is a product of erosion caused by the movement and melting of glaciers. The eroded minerals and elements make their way into streams and rivers and eventually into the ocean. Over time these particles will form a deposit and become a very dense layer that is harvested in shallower water just off the coast of Vancouver Island. This hard-packed layer will not allow vegetation to grow within it or any crustaceans to survive in it, therefore no habitat is being affected by harvesting the clay. However, phytoplankton, which are minuscule free floating plant material, are found in abundance within the deposits and are hugely beneficial for the skin. The clay also contains large amounts of minerals and elements from the Pacific ocean that neutralize the skin. 


What are the skin benefits of using this Ultrafine Cosmetic Glacial Marine Clay?

This clay's net negative ion charge attracts most positively charged bacteria, contaminants, and toxins, thereby detoxifying, rejuvenating, revitalizing, and deep cleansing the skin to a new radiance. This means that when applying a mask or poultice to the face using the ultrafine clay it will deep cleanse the skin without using chemicals or surfactant-based products which may dry the skin out.  Another beneficial element to this clay is the micro size of its particles and its amazing absorptive ability. The particle size is so small it absorbs into the skin almost instantly and delivers the nutrients and minerals directly to the deep tissue of the dermis, while the osmotic power of the clay pulls moisture up from deep inner tissues to hydrate the surface of the skin. The clay is also excellent for aiding in softening the skin, smoothing out wrinkles and stimulating blood circulation in newly exposed skin cells, leaving the skin feeling refreshed, alive and glowing. It is frequently used for treating and preventing under-eye bags, and for detoxifying and exfoliating the skin naturally without the use of chemicals. It has a pH of 6.5 - 7.3 which means that it balances the skin and sebum, helping conditions such as acne and oily skin.


How can I use the Ultrafine Glacial Clay?

This Ultrafine Glacial Marine Clay would make an exceptional addition to masks, poultices, and body wraps as well as cosmetics such as BB creams, liquid and powder foundations, powder and stick deodorants, and mineral makeup.  When used in body care formulations the general usage rate is 5% - 10% but it can even be applied directly to the skin after moistening with a bit of water. 

Check back soon for a new, trendy tutorial on how to make your own BB Cream!

Print Friendly

 
BLOG DESIGN BY DESIGNER BLOGS