We recently brought in two sizes of Wax Melt Clam Shell Molds that are designed for making squares of scented wax that burn in a candle diffuser. A huge selling point for these little containers is the fact that they not only act as a mold for the product that goes into them, they are also the packaging that you can sell your products in! They have a hole punched out at the top so they work perfectly with peg hangers. We wanted to show all our lovely customers that they are not just good for wax tarts, but for massage melts, bath bombs, melt and pour soap, bath candies, and more!
Firstly we wanted to test them out to see just how they function for their main use as a wax melt mold. We melted about 120-130 grams of EcoSoya Pillar Blend Wax in a double boiler to about 150 degrees.
Remove from heat and colour. We used our Seafoam Green vegetable-based candle dye pad, shaving in a small amount at a time. The darker you want the colour to be, the more you add but keep in mind that melted wax always looks darker than solid wax. Try dipping the back of a spoon into the wax and rapid cooling it in the freezer to see the true colour. Once the candle dye is all melted and combined, add your fragrance. We used two teaspoons of our crisp and fresh Sea Breeze scent, which is the equivalent to about a 10% scent load (the EcoSoya waxes are designed to hold up to 12% fragrance).
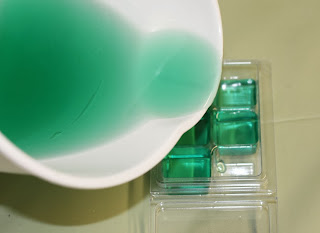
Pour the wax into a
Small Wax Melt Mold at a temperature of around 130 degrees. Let the mold sit for a few hours in order for it to harden completely. To use, just pop the bar out of the mold and break one square off, then toss into your favourite diffuser. Just like that you have a safe and eco-friendly way of smelling delicious scents all around the home!
Next we made Massage Melts. This is a super convenient way of making these little skin treats! There's no mess and the molds are very inexpensive. Try the recipe for massage melts
here or feel free to use our
Massage Bar Base! Massage Melts are not just a trendy way of massaging, they provide some exceptional skin care properties. Super high in cocoa butter, they are a wonderful way of delivering moisture to dry areas. Simply melt all the ingredients in a double boiler or microwave until no solids remain.


Add your essential or fragrance oil and stir well. Here we added
White Grapefruit and
Bergamot for an energizing experience! Make sure that the massage melt base is not higher than about 130-140 degrees, then pour into the
Small Wax Melt Molds. Let harden for a couple hours before use. To use: simply break the squares inside the mold and use one at a time for a sensual massage experience! These squares are absolutely perfect for using around dry elbows, knees, and feet, especially at this time of year when it starts getting chillier!
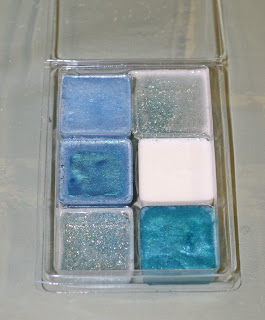
Step 1: Melt your melt and pour. We varied the pigments used and made almost every square a different colour; because this mold has separate chambers for each square of soap it gives you more time to do each colour. Melt a small amount of the base at a time and make sure you don't overheat it. Add the mica of your choice. In this snowflake-themed soap we used Blue Pearl Mica, Peacock Blue Mica, Sky Blue and Silver Glitter, and White Mica. With each little batch that you do add a few drops of fragrance. We used our crisp and warm Sleigh Ride. Pour one by one into the Large Wax Melt Molds, ensuring your temperature is no higher than about 130 degrees.
Once the soap has thickened to the point that it has a defined skin on the top, but not rock hard, pour a thin layer of clear melt and pour over the entire mold to seal all the colours together.
Wait 12 hours, unmold, and cut into the individual squares using a Stainless Steel Cutting Blade.
Cute! Our next thought was to see if bath bombs would work in the Large Wax Tart Molds and they certainly do! For a recipe on how to make bath bombs click here. Mix all the dry ingredients together in a bowl.
Add colour and fragrance to the desired levels. We used our Canary LabColor and Pumpkin Pie fragrance oil.
Moisten the dry ingredients with Witch Hazel and mix with your hands at the same time. Your mixture is ready when it holds its shape in your hand after you make a fist with it like this:
Be careful not to over moisten! If you add too much witch hazel the baking soda will react and cause the mixture to grow in volume, not what you want in this situation! Pack the mixture into the
Large Wax Melt Molds.
We used a little too much
Witch Hazel, can you see how it's foaming around my fingers? That's not exactly ideal, if there's too much moisture it will be crumbly when you try to take it out of the mold and you'll need to keep it in there for longer. We kept the bath bomb mix in the mold overnight and cut it in the morning with the
Stainless Steel Cutter, and the result was actually pretty awesome! These personal-sized bath bombs work great and release the soothing scent of pumpkin pie while they bubble.
As the holiday season fast approaches we urge our customers to think outside the box and try something new! You could even make a whole line of products in the wax melt molds and package them in our selection of
Gift Baskets!


No comments:
Post a Comment